
Understanding ‘color spaces’ is a crucial part of ensuring accurate and consistent colour reproduction across different mediums. Each color space has a different gamut (ranges of colours), so it’s essential to choose the right option based on the intended output of the image – which introduces the debate of sRGB vs Adobe RGB. Read on to find out when to use each one.
What are Color Spaces?
In the world of photography and imagery, ‘color spaces’ (or workspaces) are an important setting which control our working colour environment in our image hardware or editing software. It represents the colours of the image on our monitor displays, as well as being used to translate the captured colour data from the display device to an output device (i.e. an inkjet printer).
A PermaJet colleague of mine describes color space in a very simple term which everyone can visualise. Imagine printing your images on the outside of a balloon and assume that is one color space. Then, inflate the balloon by 25%. Although you have the same image on the balloon, you have moved the colour pixels into a different area on its surface, visually changing their appearance.
This is effectively what a color space does – it expands the colours into a bigger area, taking advantage of the devices capabilities. We could call this the “colour gamut” (or spread of colours).
The two most commonly used color spaces are sRGB and Adobe RGB (1998). Their first appearance comes into play when you capture your image, as your camera workspace is usually defaulted to sRGB (but there will be an Adobe RGB setting available).
Understanding sRGB
sRGB was developed back in 1996 by Microsoft and HP, with ‘s’ meaning standard and ‘RGB’ meaning Red/Green/Blue. sRGB was selected as the standard colour setting for all cameras and screens because 97% of the captured colours could be displayed.
For this reason, sRGB has also become the standard working color space for all websites and social media platforms on the internet, ensuring images will look virtually identical. It utilises the 97% accuracy of the colours displayed on the screen with little or no visible differences to the naked eye on any screen device.
The downside of sRGB when it comes to printing is that it is not the same size of colour gamut as Adobe RGB 1998, which is much larger and more suited to printers.
Understanding Adobe RGB (1998)
Adobe RGB was created in 1998 by Adobe Systems with the concept of trying to match as many colours as possible of a true CMYK printer (printers used in commercial environments commonly use a specific pre-press color space called CMYK (Cyan, Magenta, Yellow, and Black)).
Adobe RGB is truly a much larger color space – estimated to be around 35% larger than the standard sRGB. The benefit to this is that you gain extra colour information in the greens and blues of your image whilst retaining all other colours in the spectrum.
The great news is that this ‘extra’ colour information of your image can be reproduced on paper by printing on any professional 6 ink or more inkjet printer. The negative is that only 76% of the colours of Adobe RGB can be shown to you on your monitor screen, owing to its limitation to sRGB (unless you buy a specific Adobe RGB 1998 monitor such as Eizo or BenQ designed for photography work).
Key Differences Between sRGB and Adobe RGB
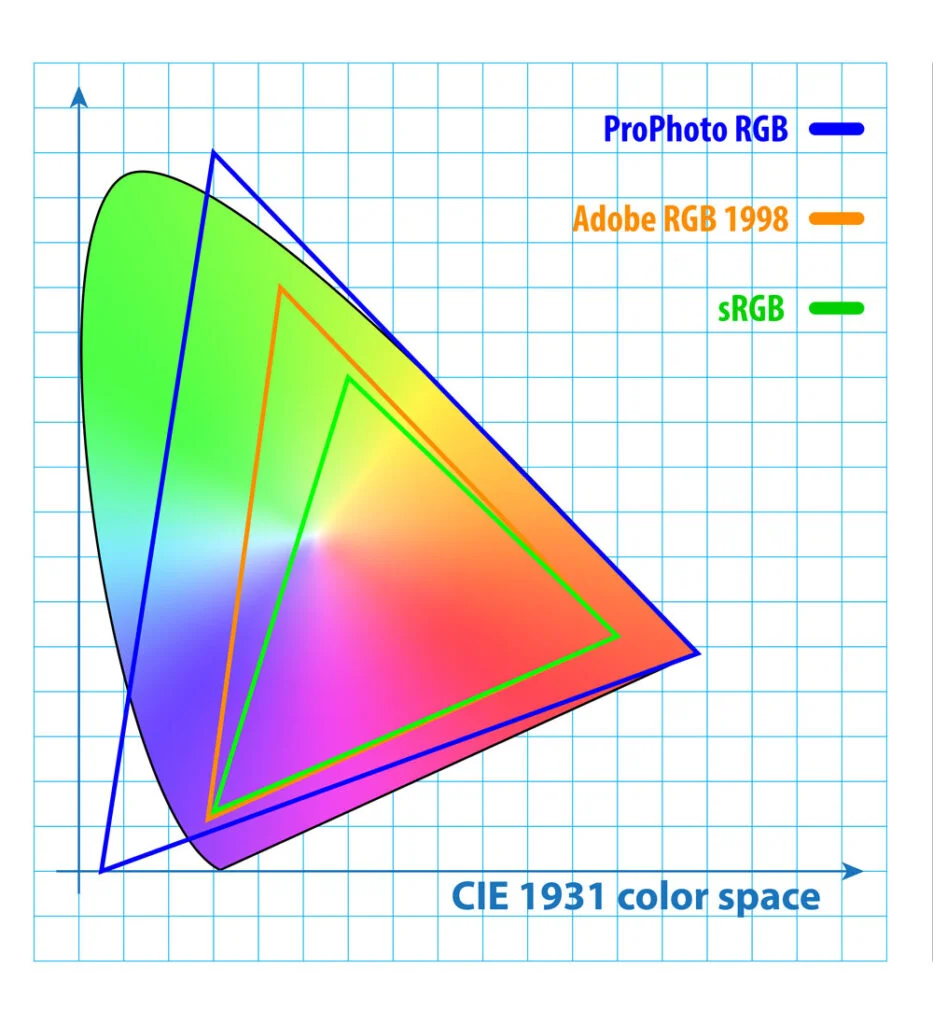
This diagram best demonstrates the size of different color spaces.
By altering an images color space from its original sRGB setting, you can gain benefits for printing by taking advantage of the extra colours your printer is able to produce – visually you will see more zing and contrast in the results.
sRGB tends to produce more ‘dumbed down’ printed results with its limited colour gamut.
A simple summary of sRGB vs Adobe RGB
| sRGB | Adobe RGB |
| + Excellent for website and digital images | + Better for printed images |
| + The standard workspace in your camera | + Can be selected in your camera |
| + Produces acceptable printed images | + Adds “zing” and punch to your printed image |
| + Globally accepted as a default color space | + Expands the image colour gamut |
| – Restricts the colour gamut on printed images | – Not great for web/social media images |

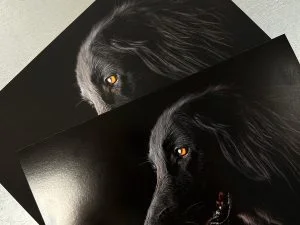
As you can see from the above, the left hand side is a printed sRGB image and on the right is a printed image using the Adobe RGB (1998) color space. The extra lift in the colours on the Adobe RGB print is visually obvious showing more detail and clarity than the standard sRGB image.
Choosing the Right Color Space for Printing
Changing the color space to Adobe RGB seems the obvious thing to do when sending an image to print, and in many instances it is certainly advantageous. However, there may be certain images where the conversion is of no advantage or is not recommended.
You should convert or leave as sRGB any image that you are using for the internet. Be aware that if you capture an image on your camera as Adobe RGB, then convert it to sRGB later, it will not look the same vibrancy or colours when viewed digitally.
It is also worth noting that monochrome images do not really make use of these color spaces when being printed, especially if you use the built-in black and white printing mode on your printer driver provided by the manufacturer.
In essence, the question you are asking yourself when capturing your image is “What will I do with this image once it is loaded into my editing software?”.
Common Misconceptions About sRGB and Adobe RGB
We don’t think we can say that one is better than the other as they clearly serve different purposes. The intended use of the image will determine your best practice and choice of color space.
It is true that the act of converting an images color space can cause some loss of important colour information originally captured within the image, but visually this is rarely seen by the naked eye.
There are certainly some diehard photographers out there who will insist that conversion just makes no difference. This just highlights how incredibly inefficient our eyes are at judging colours. Whilst you should be able to see comparative differences of results when presented side by side, prints shown in isolation generally look “OK”. The person judging that image is more likely to try and compare it to the monitor/screen, but they will never look identical. It is more about how much punch and contrast you want in the final result.
Another interesting fact is that some programs such as Adobe Lightroom, despite handling images in a RAW format, display images to you in a color space known as ‘ProPhoto RGB’. This color space possesses the widest colour gamut on the market but is actually too extreme for the capabilities of modern inkjet printers. It falls heavily into the red area of the colour spectrum, way beyond that of Adobe RGB (1998) and would never be recommended for printing use. The good news is that this color space is not usually stored with the file when you save it, and so when opened in software elsewhere (like Photoshop), the software will allow you to select the use of sRGB or Adobe RGB again.
Tips for Working with Color Spaces
A common question is how to set a color space. Firstly, check your camera – find the color space setting and have a play with it. Take some photos in that mode and some in another – download and compare these images on your monitor or even print them – you should begin to see the possible differences, no matter how small, and decide what works best for you.
Secondly, it is easy to set a color space within an editing program such as Adobe Photoshop.
You need to gain access to the Color Settings area by opening Photoshop and selecting EDIT >> COLOR SETTINGS. The only relevant color space (working space) box to look at is in the RGB dropdown. It will be set at ‘sRGB’ by default and this can be changed to ‘Adobe RGB (1998)’ if most of your work is intended to be printed.

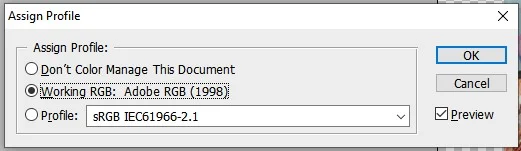
Another way of visualising what a color space change might do to your image is to open it in Photoshop, go to EDIT >> ASSIGN PROFILE and select the appropriate workspace/color space you want to apply to your current image. The preview checkbox allows you to view the change from one space to another and you can see the impact on your image on your screen as it happens.
Summary
Hopefully there is enough information in this article to add a little clarity to what color spaces do without being over-technical.
Your best course of action is to experiment with the camera and print output by changing the color space of a particular image and printing it or viewing it as suggested.
If you continue using only sRGB, just be aware that the colours will be ‘as is’, as they are not compressed in any way. So, there will be no issues if you are publishing your images online and even if you want to print them – they will be just fine even with a smaller color space. However, in some kinds of image you might find that little bit of ‘zing’ and contrast is missing. You will possibly wonder why the image looks a bit flat and muddy or like a fog has descended over it – that’s the time to try Adobe RGB color space instead.
Using Adobe RGB (1998) workspace all the way through your process does no harm. You can still convert the image back to sRGB if it is needed for monitor viewing or use on a website. Capturing images in Adobe RGB preserves the largest colour gamut for your photo and gives you the best chance of producing that printed masterpiece (on PermaJet high quality media of course) without wasting ink and paper.
FAQ’s
Is sRGB better than Adobe RGB?
sRGB is better than Adobe RGB if you are posting your images online, as it will give you consistency. However, if you are printing your images, then Adobe RGB is usually the recommended choice.
Should I export photos in sRGB or Adobe RGB?
Whether you should export your photos in sRGB or Adobe RGB is down to your intended use for the image. If you are just posting images on the internet then sRGB should suffice, but if you intend to print your images, Adobe RGB is the better choice for a wider colour gamut.
Should I shoot raw in sRGB or Adobe RGB?
Most cameras are formatted to shoot in sRGB, but shooting in Adobe RGB will capture more colours. You can always convert to sRGB later on.