Adobe Lightroom offers you some excellent colour management features to help you get the most pleasing and colour accurate inkjet prints. You will of course need good printer profiles for the papers that you are using (and of course good inkjet papers). Would you like to know more? We provide FREE ICC Profiling Services and a full range of Digital Photo & Fine Art papers.
Soft-Proofing
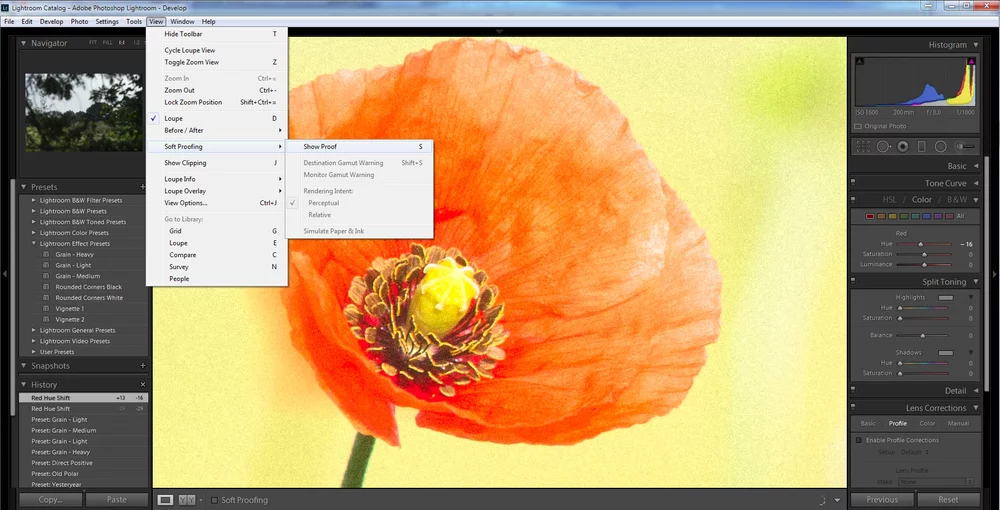
The first place that Lightroom allows you to use a printer profile is not in the Print module, but in Develop. After you have edited the image so it appears as you want it to on screen you can then use the soft-proofing feature to check how it will actually print. You will need a well calibrated and profiled monitor to get the most out of this feature.
Soft-proofing is simply previewing how an image will reproduce before actually printing. You will get a chance to see how colour changes before you use paper and ink. Simply go to the View menu and Soft Proofing, Show Proof, or check the soft-proofing check box underneath the image, or just hit the ’s’ key. You can select sRGB, Adobe RGB, a printer profile or choose to load another ICC profile. Lightroom will then convert on the fly from its internal colour space to the profile you’ve chosen and then onwards to the monitor profile, rather than direct from the internal space to the monitor. This enables the screen image to simulate the print. You can choose between perceptual and relative colorimetric rendering (each will be subtly different) and the Simulate Paper & Ink check box better emulates both the paper colour and the tonal range of the printer profile. If colours change more than you’d like you can click Create Proof Copy which generates another version of the image that you can edit whilst viewing the soft-proof, but bear in mind you’ll still be limited by the gamut you are converting or printing into.

Soft Proofing in Lightroom, image by Alex Cullen
Printing
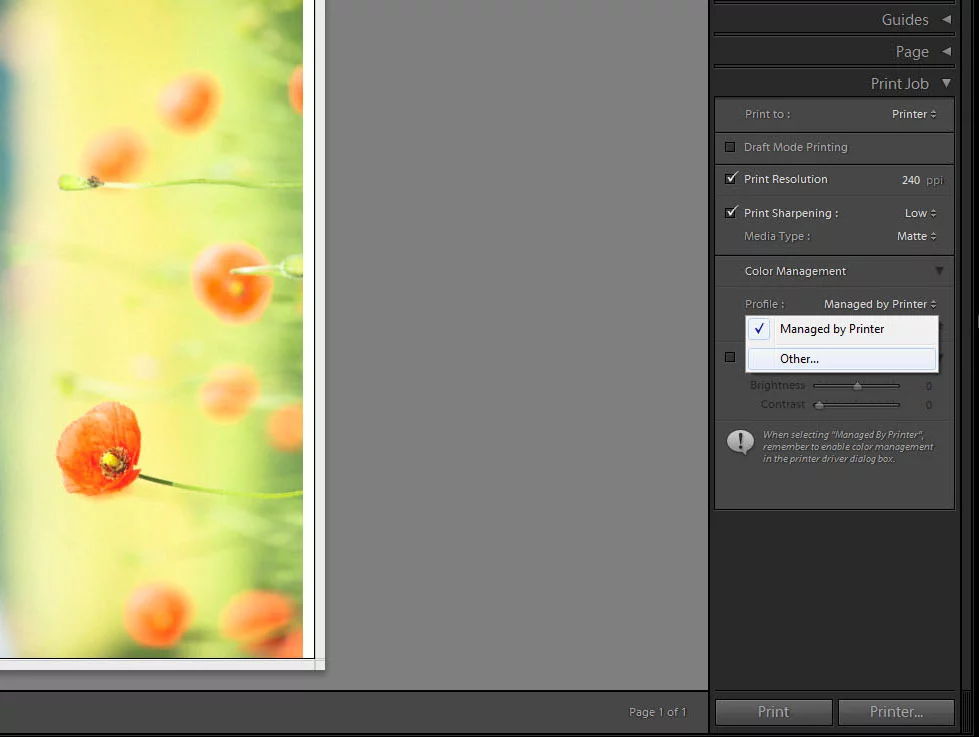
Adobe Lightroom’s Print module obviously allows you to use a printer profile as well. Scroll down the options on the right of the screen and you’ll find the colour management section. The default option is Printer Manages Colour (which will seldom produce acceptable results) but you can also click the menu to change the option to a printer profile that will then let Lightroom control the colour. If you don’t see the profile that you want in the menu select Other which let you choose the printer profiles that you want to have in the menu.

Selecting Profiles in Lightroom, image by Alex Cullen
You get options for perceptual or relative colorimetric rendering intents. A rendering intent is the way the colours get converted from one profile to another. Perceptual sometimes gives better highlight and shadow detail than Relative, and also may retain more colour variation and detail. Whereas Relative will print those colours within the gamut, or range of the printer, more accurately. Colours outside the printer’s gamut will be brought into gamut whilst those inside remain unchanged. Which intent to choose depends a lot on the image and printer profile in question. You will tend to see more difference between the two rendering intents on matt papers. We have a helpful blog that explains the how Rendering Intents can help your printing
.
You can also make quick brightness and contrast edits in the colour management section as you print but it’s generally best to follow the soft print procedure above to get the most accurate results.
#printerprofiles #lightroom #howto #renderingintents #permajet #RobGriffith #technical


